MongoDB and Load Balancer Support
Overview
A load balancer enhances your application’s scalability, availability, and performance by efficiently distributing traffic across multiple servers based on a number of algorithms and techniques - but what about your database? MongoDB is a distributed database, but can it be placed behind a load balancer?
Astute readers of MongoDB’s Node.js driver’s test README may have noticed at some point that there is mention of a testing methodology for load balancers, and as some in the community have found you can find public SERVER tickets that also allude to this functionality existing.
Digging further you’ll find the Load Balancer Support specification for MongoDB’s drivers which states “To specify to the driver to operate in load balancing mode, a connection string option of loadBalanced=true MUST be added to the connection string” … but how do you actually make that work?
In this post we’re going to explore why MongoDB nodes couldn’t previously be placed behind an L4 load balancer, and what changed in MongoDB 5.3 that may actually make this possible!
Replication
Coordination of data distribution and ensuring high availability is done via replication, which requires the cluster to be aware at all times which node is the primary and which are secondaries.
As there can only be one primary, any application targeting the cluster will need to be aware of the current topology as well, as trying to write to a secondary will fail:
1
2
3
4
5
6
7
require 'mongo'
# connect directly to a secondary host in a local replica set
client = Mongo::Client.new('mongodb://localhost:27018/test?directConnection=true')
collection = client[:foo]
collection.insert_one bar: "baz"

# => Mongo::Error::OperationFailure: [10107:NotWritablePrimary]: not primary (on localhost:27018, legacy retry, attempt 1)
All official MongoDB drivers implement the Server Discovery and Monitoring specification to ensure applications can route requests to the appropriate servers (as outlined in the Server Selection specification). When you have a single application instance with a single connection pool (as outlined in the Connection Monitoring and Pooling specification) the number of connections to the cluster is easy to identify, but application deployment configurations can vary and scale.
Thanks to MongoDB drivers all consistently providing connection monitoring and pooling functionality, external connection pooling solutions aren’t required (ex: Pgpool, PgBouncer). This allows applications built using MongoDB drivers to be resilient and scalable out of the box, but based on what we understand regarding the number of connections applications establish to MongoDB clusters it stands to reason that at a certain point as our application deployments increase, so will our connections.
Can I use a load balancer though?
Due to the need for these additional monitoring connections it has been difficult (impossible?) to place a load balancer between applications and a MongoDB replica set - though adventurous users have developed some interesting HAProxy configurations in the past to try and solve this problem. The problem you’d face is that though read requests can be routed to any available server, write requests must target the cluster primary.
For the sake of argument you may ask “what if I had a 100% read workload?”. In that case you could put your hosts behind a load balancer, but you’ll likely run into issues as soon as you try and iterate a cursor (see getMore). Operations such as find or aggregate return a cursor (cursorId) which only exists on the originating server the command targeted. Attempting to execute a getMore on the wrong server will result in a CursorNotFound error being returned, which can be challenging to troubleshoot.
Sharding
Fortunately, MongoDB already offers a form of “load balancing” for sharded clusters in the form of the sharded cluster query router (mongos).
Assuming the cluster is sharded and if there is more than one mongos instance in the connection seed list, the driver determines which mongos is the “closest” (i.e. the member with the lowest average network round-trip-time) and calculates the latency window by adding the average round-trip-time of this “closest” mongos instance and the localThresholdMS. The driver will load balance randomly across the mongos instances that fall within the latency window.
Can I use a load balancer though?
Sharding introduces a routing layer between the application and the cluster members, which slightly simplifies how drivers route operations as there is no longer a need to track replica set state. You may think this would make placing a pool of mongos’ behind a load balancer straightforward, but as Craig Wilson describes in a 2013 blog post, similar issues will still arise when trying to iterate cursors. Note that though Craig’s post references the legacy opcodes, the situation would be the same if using newer drivers that leverage OP_MSG and OP_COMPRESSED.
Note that the Server Selection specification calls out that “Cursor operations […] do not go through the server selection process. Cursor operations must be sent to the original server that received the query […]”. As this state information would not be tracked within the load balancer, issues would arise if a cursor operation were attempted and a balancer returned a different server where the cursor didn’t exist.
operationCount-based Server Selection
As it is a form of “load balancing” it’s worth just calling out that in an effort to alleviate runaway connection creation scenarios (“connection storms”) the drivers approximate an individual server’s load by tracking the number of concurrent operations that node is processing (operationCount) and then routing operations to servers with less load. This should reduce the number of new operations routed towards nodes that are busier and thus increase the number routed towards nodes that are servicing operations faster or are simply less busy.
Load Balancer Support
When you see a ticket called “Enable Feature flag for Support for Deploying MongoDB behind a L4 Load Balancer” closed out as fixed for MongoDB 6.0.0-rc0 and 5.3.0-rc3 it’s hard not to get excited - but what does this mean? After doing a bit of digging you’ll find that mongos’ now support a proxy protocol which is configured via the loadBalancerPort startup parameter.
Given that there’s a driver specification, driver implementations (such as for the Node.js driver and Ruby driver) and server support it should be possible to configure a sharded cluster to utilize the proxy protocol.
Before we proceed it’s worth calling out that this is not considered an officially supported configuration. Until MongoDB’s server team promotes this as a valid production configuration it should be considered experimental if used with a self-managed deployment.
Configuration
For our test we’ll be configuring a single-shard sharded cluster with 5 mongos’ behind an HAProxy load balancer. Assuming you’re already familiar with HAProxy and load balancing concepts, we’ll be setting up a TCP proxy to perform roundrobin balancing.
1. Setup a local sharded cluster
First we need a local sharded cluster, which we’ll provision using m - the MongoDB version manager and mtools.
1
2
3
m 7.0.6-ent
mlaunch init --replicaset --nodes 3 --shards 1 --csrs --mongos 5 --binarypath $(m bin 7.0.6-ent) --bind_ip_all
mlaunch stop
This configuration will yield a single shard with 3 nodes, a config server replica set and 5 mongos’. Once started, we immediately stop the cluster as some additional (manual) configuration is required.
2. Update the cluster configuration to enable proxy protocol
Since we need to modify the startup parameters for our mongos’ we’ll update the configuration file that mlaunch (part of mtools) uses.
1
2
3
4
5
6
sed -i '' 's/ --port 27017 / --port 27017 --setParameter loadBalancerPort=37017 /g' data/.mlaunch_startup
sed -i '' 's/ --port 27018 / --port 27018 --setParameter loadBalancerPort=37018 /g' data/.mlaunch_startup
sed -i '' 's/ --port 27019 / --port 27019 --setParameter loadBalancerPort=37019 /g' data/.mlaunch_startup
sed -i '' 's/ --port 27020 / --port 27020 --setParameter loadBalancerPort=37020 /g' data/.mlaunch_startup
sed -i '' 's/ --port 27021 / --port 27021 --setParameter loadBalancerPort=37021 /g' data/.mlaunch_startup
mlaunch start
The above commands just append a setParameter call as a command line option so we can configure the loadBalancerPort parameter of each mongos. Once completed we restart the cluster.
3. Configure HAproxy
As we’re using HAproxy for our test we’ll to build out our custom configuration. The example below will write to a mongodb-lb.conf file, which will then be read by haproxy to create our load balanced endpoint. I’m not going to go into detail as to what all the options below mean, but if you want to investigate further see HAproxy’s configuration manual.
1
2
3
4
5
6
7
8
9
10
11
12
13
14
15
16
17
18
19
20
21
22
23
24
25
26
27
28
29
30
31
32
33
34
35
tee mongodb-lb.conf > /dev/null <<EOT
global
  log stdout local0 debug
  maxconn 4096

defaults
  log global
  mode tcp
  timeout connect  5000ms
  timeout client  30000ms
  timeout server  30000ms
  retries 3

default-server on-error fastinter error-limit 3 inter 3000ms fastinter 1000ms downinter 300s fall 3

frontend stats
    mode http
    bind *:8404
    stats enable
    stats uri /stats
    stats refresh 10s
    stats admin if LOCALHOST

listen mongos
  bind      *:37000
  option    tcplog
  balance   roundrobin
  server    mongos01 *:37017 check send-proxy-v2
  server    mongos02 *:37018 check send-proxy-v2
  server    mongos03 *:37019 check send-proxy-v2
  server    mongos04 *:37020 check send-proxy-v2
  server    mongos05 *:37021 check send-proxy-v2
EOT

haproxy -f mongodb-lb.conf > haproxy.log 2>&1 &
To make monitoring a little easier you’ll notice we’ve enabled HAProxy’s stats frontend.
4. Test application connectivity through the load balancer
Since the MongoDB Shell uses the Node.js driver internally we can use to validate if our load balancer is configured properly. We’ve setup HAProxy to listen on port 37000, so we should be able to connect to that directly:
1
2
mongosh --quiet "mongodb://localhost:37000/test"
MongoServerSelectionError: The server is being accessed through a load balancer, but this driver does not have load balancing enabled
Seems the driver knows we’re trying to connect to a load balancer, but we’re missing an option. This is where the loadBalanced=true option comes into play. Appending this to our connection string will allow us to run an arbitrary workload successfully:
1
2
3
4
5
6
7
8
9
10
11
12
13
14
mongosh --quiet "mongodb://localhost:37000/test?loadBalanced=true" --eval "while(true) { result = db.foo.insertOne({ d: new Date() }); print(result); sleep(500); }"
{
  acknowledged: true,
  insertedId: ObjectId('65eb13b122c34af3037c094d')
}
{
  acknowledged: true,
  insertedId: ObjectId('65eb13b222c34af3037c094e')
}
{
  acknowledged: true,
  insertedId: ObjectId('65eb13b222c34af3037c094f')
}
...
Success! It is worth noting though that this configuration works for us locally as we have direct control of the mongos processes startup parameters.
If you have a MongoDB Atlas sharded cluster, the
mongos’ cannot manually be placed behind a load balancer as startup parameter configuration access is not available!
Conclusion
Now that we can successfully connect to our load balanced endpoint it’s worth doing a little chaos testing to see how workloads react. The script I shared previously just loops infinitely inserting documents into a collection - but what happens if we kill one or two mongos processes?
1
2
3
4
5
6
7
8
9
10
11
12
13
14
15
16
17
18
19
mlaunch stop 27017
mlaunch stop 27019
mlaunch list
Detected mongod version: 7.0.6

PROCESS          PORT     STATUS     PID

mongos           27017    down       -
mongos           27018    running    28006
mongos           27019    down       -
mongos           27020    running    28013
mongos           27021    running    28016

config server    27025    running    27979

shard01
    mongod       27022    running    27994
    mongod       27023    running    27998
    mongod       27024    running    27991
Using mlaunch I just stopped two of the query routers and waited for a while. The inserts kept on - inserting - so I guess we can consider that a successful test. Note that this is obviously not extensive and should not be taken as a guarantee of any sort, but if this is a configuration that interests you give it a shot and let me know what you find.
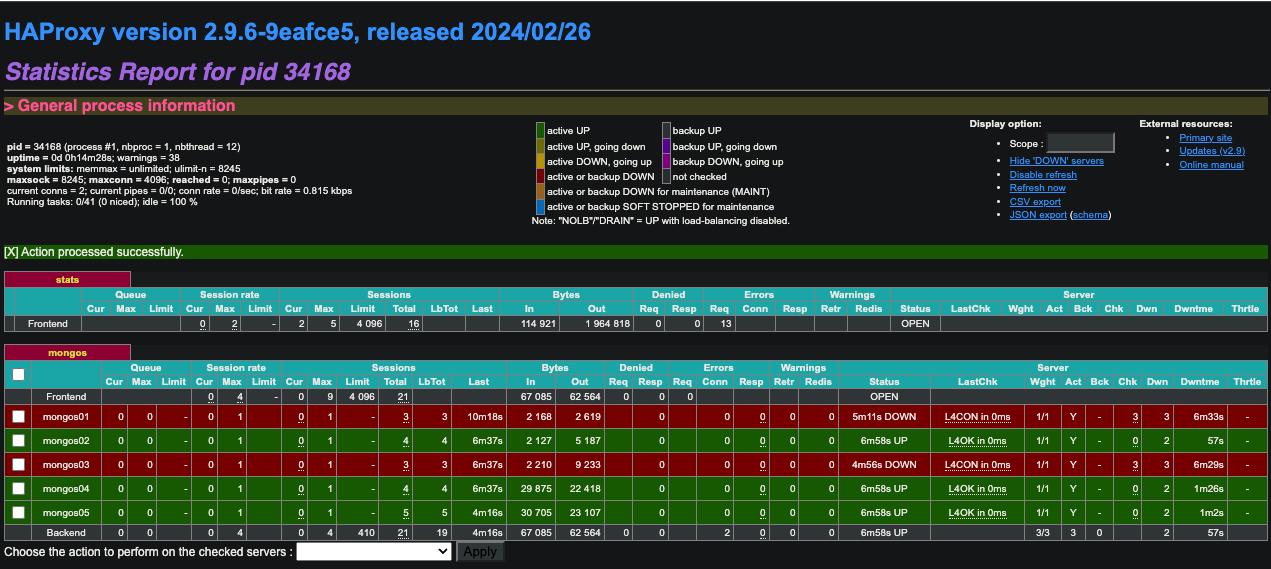
Don’t forget that you have a web-based stats UI configured that you can refer to 😉.
Comments powered by Disqus.